Everyone loves chocolate… and so do I 🙂 ! As I love to understand the various health aspects of food that we eat, I was curious in making a healthy chocolate. Of course I am not the first person to discover this. Nevertheless, it took me some time to experiment and find the proper resources that helped me understand the process of making chocolate. So, I would like to share this information.
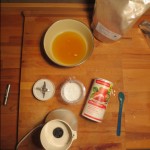
Here is the list of the ingredients for my personal chocolate recipe. To truly benefit from cacao, we need to make sure that our ingredients are raw ingredients if possible. As sweetener, I tend to use xylit as it has good sweetening properties and it has no negative effects on our body (it is even good for your teeth health!). Here are all ingredients you need:
- 250g raw cacao butter (250g)
- 6 tablespoons raw cacao powder (feel free to add more)
- 8 tablespoons xylit (ground to be powder so that it can dissolve more easily)
- Almond creme (2 tablespoons)
- Spices: a tiny bit of (ground) salt, vanilla (very important!), cinnamon, chili powder
Crystallization properties of cacao butter
Have you ever tried to melt the chocolate and then to put it into the fridge? What was the result? When I tried it, I experienced crumbly and soft chocolate which melts to easily. The surface was not nice and shiny, but rather dull and unpleasant. This is due to the fact that cacao butter has different types of crystals with different melting properties.This is why one needs to temper chocolate. Wikipedia summarizes this nicely:
The final process is called tempering. Uncontrolled crystallization of cocoa butter typically results in crystals of varying size, some or all large enough to be clearly seen with the naked eye. This causes the surface of the chocolate to appear mottled and matte, and causes the chocolate to crumble rather than snap when broken. The uniform sheen and crisp bite of properly processed chocolate are the result of consistently small cocoa butter crystals produced by the tempering process.
The fats in cocoa butter can crystallize in six different forms (polymorphous crystallization). The primary purpose of tempering is to assure that only the best form is present. The six different crystal forms have different properties.
The different crystal types with their varying melting temperatures and properties are the following (also taken from Wikipedia):
| Crystal | Melting temp. | Properties |
|---|---|---|
| I | 17°C (63°F) | Soft, crumbly, melts too easily |
| II | 21°C (70 F) | Soft, crumbly, melts too easily |
| III | 26°C (79°F) | Firm, poor snap, melts too easily |
| IV | 28°C (82°F) | Firm, good snap, melts too easily |
| V | 34°C (93°F) | Glossy, firm, best snap, melts near body temperature (37°C) |
| VI | 36 °C (97 °F) | Hard, takes weeks to form |
This is why we will need the tempering process as described below.
Armed with this important secret of making chocolate, we can now start to actually make chocolate…
Step 1 – Make xylit powder
Use a coffee grinder or a small blender to grind the xylit. Xylit crystals will not dissolve easily in cacao butter, so grinding the will spread the sweet taste of xylit well in the chocolate.
Step 2 – Melt the cacao butter
The easiest way to do this is to but a bowl with cacao butter into a bowl with warm water (it should not be to hot). Monitor the temperature (best with a infrared thermometer) until the cacao butter has reached approximately 43°C. This way we make sure that no ingredients of the cacao butter will be denatured by heat.
Step 3 – Blending ingredients together
Now it is time to blend all ingredients into a nice dark chocolate mass. I like to use a blender on a small speed level. Blending helps for building up many small crystal seeds. These little seeds will then later help to build up a fine cacao butter crystal structure.
Step 4 – Tempering
During blending, the chocolate mass will cool down. Let it cool down to about 28°C. Now we want to make sure that our chocolate contains as many type V crystals as possible. For this we will heat up the mixture up to 32°C and thus we will give more time to the type V crystals to form. You can heat up the chocolate mass again in a water bath. Make sure that you stay below 32°C while observing carefully the temperature. At any time, it is important to keep stirring in order to spread the heat evenly.
Step 5 – Mold the chocolate
It is now safe to pour the chocolate mass into any mold you like. Let it cool down at room temperature. After some time, be amazed about your home made healthy chocolate that has a nice, shiny texture and a firm snap 🙂 . Enjoy!!!
-

- Chocolate ingredients
-

- Melt cacao butter
-
- Grind xylit to powder
-

- Blend all ingredients
-

- Let the chocolate cool down
-

- Heat it up again
-

- And put it into molds
-

- Voilà…
-

- Final result 🙂
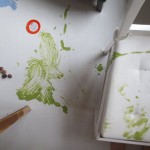
These days, I received an email at noon from my wife showing me some pictures that proof how much my daughter loves green smoothies! Indeed, they seem to inspire her very much. Thanks to them, Lucie could start to discover her sense of art and painting 🙂 . How wonderful!
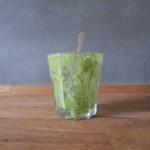


We had beautiful weather outside here in Bremen today 🙂 ! In the past days I got an idea for making chocolate ice cream. Using a mixer you can generally make nice sorbet ice creams by simply taking frozen fruits (e.g., a mixture of red fruits) with some spices (e.g., cinnamon and a bit of lemon juice), Xylit for sweetening and mixing them up. Mjami 🙂 . Now, making chocolate ice cream I made a first try today using frozen banana slices. The recipe is fairly straight forward (for one portion):
- 1.5 frozen bananas
- 2 tea spoons of raw chocolate powder
- 2 tea spoons of Xylit
- some almonds (optional)
- 1 table spoon of Goji berries (=extra does of antioxidants)
For a first try, it was really tasty! I think the next time I’ll add some coconut cream to add some (raw) fats and which will make the taste come out smoother and which will also render the texture more creamy.

On the way to the perfect raw chocolate… for my latest experiment, I made raw chocolate with different kinds of healthy sweeteners:
For the experiment, we were three people to judge the quality of the sweetener between 0 (awful) and 10 (awesome). The outcome is interesting. Marple syrup and agave syrup seem to be the best, closely followed by Xylitol. Stevia is ok (here I used dried and grinded Stevia), however, its sweetnes does not seem to get a full and round taste. Its taste is rather sharp and if used too much, it can be disturbing. Maybe it would be better with fresh stevia? Molasses has not been judged well, as it comes a long with a very strong taste and not so much sweetness.
For my last chocolate preparations I was using Xylitol (with a bit of stevia) as it seems to be healthywise (especially for the teath) the most advantageous sweetener. One downside during the experiments was that its crystals did not melt in the chocolate. Blending chocolate and Xylitol together at a high speed before pouring them into the molds has proven to be helpful. I like the final outcome 🙂 .
Here is the final result of the average score along with standard deviation indicated by the error bars:

One of this weekend’s highlights: My first self-made raw chocolate! The good things are that it’s healthy (sic! unheated, raw chocolate is a very rich source of anti-oxidants, including flavonoids and many minerals), super tasty, fun to do, and fairly easy! Miammmm! Try googling some recipies. I’m still experimenting with the sweetener, Xylitol (sweet & good for your teeth!) seems to be a very good option, but the taste does not convince me yet… I still need to experiment 😉 . Agave syrup is the safe way to go for now. Here some pictures of the final result…


© 2026 Alex' Homepage | Theme by Eleven Themes